Not all software products are equal. Some go on to become household names, like Microsoft Windows, Android, and Google Search, while others fade. It’s not only a matter of luck or resources. A software’s success boils down to how you apply software product design fundamentals, from discovery to development and delivery.
Good software product design backs every decision with evidence, links user needs to business goals, and creates interfaces that scale without breaking. Read on to learn the basics of creating software products users love.
What is Software Product Design
Software product design is the practice of defining and shaping a digital product to meet user needs and business objectives. It’s an iterative process, from conducting research to inform ideas that become testable prototypes, to validating implementations and refining the final product. Beyond visuals, software product design is built on well-defined structure, behavior, and accessibility, along with ongoing measurement that keeps a product relevant as it grows.
Key Components of Software Product Design
An effective product design for software comprises several core components that shape how a product looks, feels, and functions. Each of them impacts how user needs and business goals translate into usable software.
User research and personas
You can’t design for everyone. Effective design starts with knowing who you’re designing for and why.
Knowing your audience
User research combines interviews, surveys, analytics, and observational methods to identify real users and their goals. Capture demographic and psychographic information, what they need, the environments they work in, and the challenges they face. Then, create distinct personas that act as anchors for your software product design process.
Know your purpose
Once you know who you’re designing for, ask what job the product is being hired to do. The Jobs-to-Be-Done (JBTD) framework shifts focus from features to outcomes, framing the problem as a job to guide feature scope and design metrics. Case in point, users don’t download a shopping app to have an app; they hire it to find and buy clothes quickly without visiting physical stores.
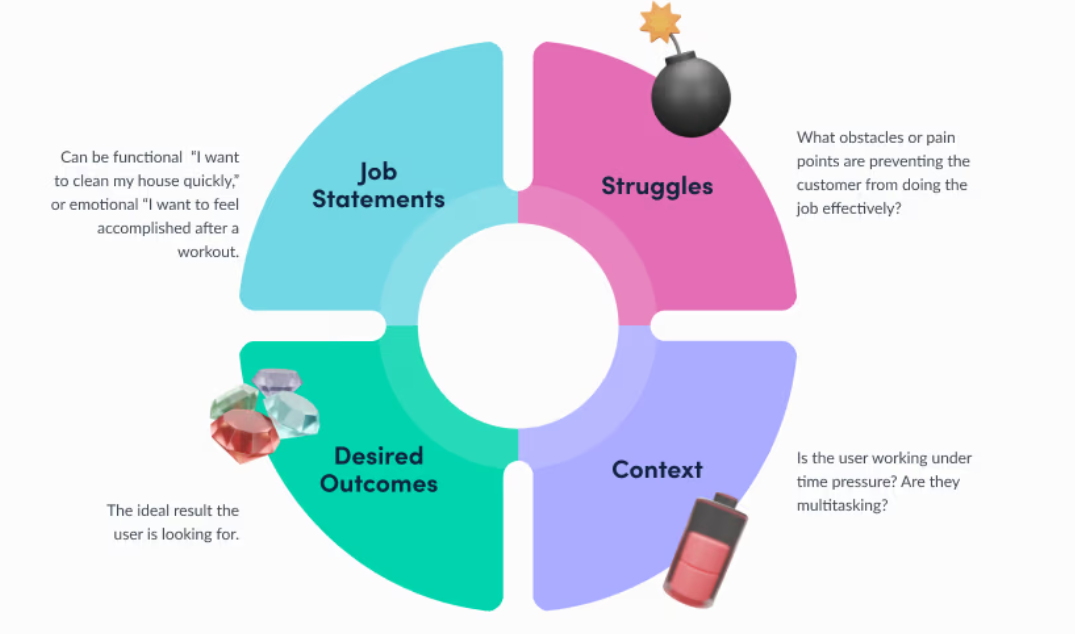
Jobs-to-be-done framework via Product School
Understanding emotions
User research should capture the emotional context of use—frustrations, anxieties, and moments of joy. Empathy helps prioritize solutions that reduce challenges and deliver a positive user experience. Techniques like diary studies and contextual interviews reveal emotions that surveys may miss.
Information architecture
How content and features are organized and presented directly influence usability. If users can’t find what they need, the product feels broken, which can reflect poorly on your brand.
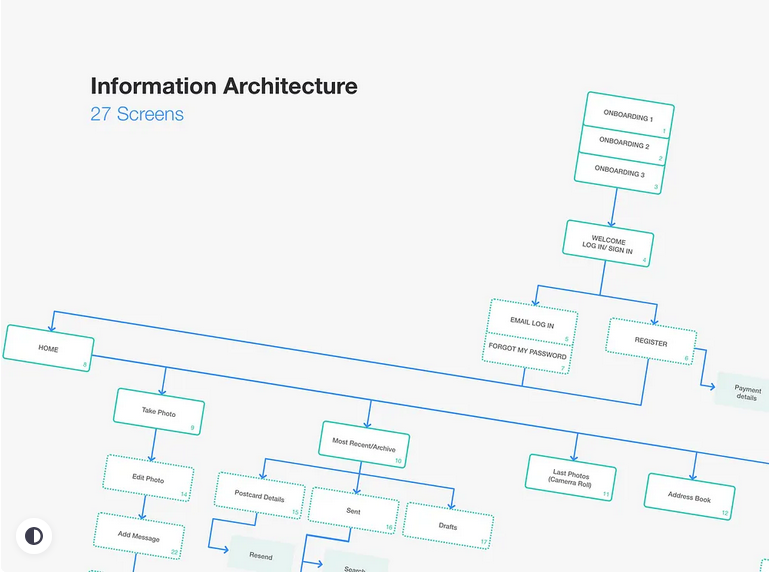
Example of a mobile app information architecture diagram via Dribbble
Prioritizing and labeling content
Information architecture (IA) decides what’s visible, where, and when. It defines content hierarchy, navigation, and labeling. That said, build IA around users’ mental models—how they think about tasks and categories—so information is easy to find and predictable.
TIP: Keep paths short and aim for content to be discoverable within three clicks.
UX design
UX design shapes how people accomplish tasks and perceive the product. It focuses on flow, clarity, error prevention, and accessibility.
Core principles of UX design
- Functional: The product must reliably perform its core tasks.
- User-friendly: Reduce intimidation with clear onboarding, contextual help, and sensible defaults.
- Intuitive: Match interfaces to users’ expectations and familiar patterns. Everything should be easy to figure out.
- Enjoyable: Utility is important, but creating an interaction that users enjoy builds brand loyalty and enriches the experience.
You don’t design software products thinking everything will go smoothly. So, map user journeys from entry point to task completion, and design for edge cases (extreme scenarios) and failures as deliberately as you would for the happy path (best-case scenario). Accessibility is important, so ensure all the features are easy to find and use, even for users with disabilities. For instance, check for color contrast, provide keyboard support, and include alt text for images.
UI design
UI (user interface) is the visual and interactive layer users engage with. It includes buttons, images, videos, spacing, typography, color palettes, etc. A chaotic, inconsistent UI reflects poorly on your software’s credibility, so it’s important to integrate visual hierarchy, design systems, and appropriate signifiers.
Visual hierarchy
It tells users where to look first and what to do next so they can process information simultaneously. For instance, larger objects are perceived as more important. High-contrast elements are easily seen. Formats position elements strategically. Spacing and proximity serve as pauses and visual cues.
The goal is to lighten the cognitive load for a seamless interaction and ensure users can complete tasks effortlessly.
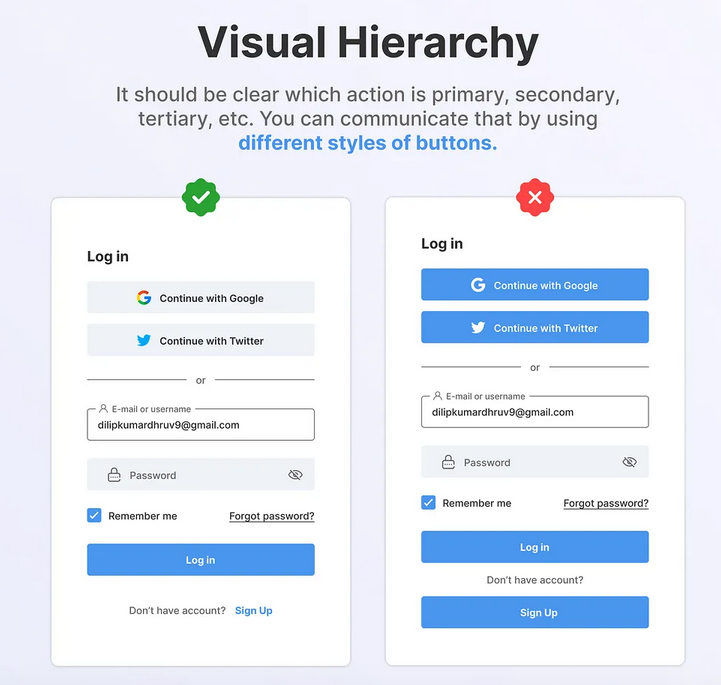
Visual hierarchy example via Dribbble
Design systems
A design system centralizes components, guidelines, and accessibility rules. It ensures consistency, speeds design-to-development handoff, and scales across teams. A design system includes a component library, a style guide, a pattern library, and usage rules.
Core elements of UI design
- Layout and grid: The layout guides designers on where to place navigation, sidebars, and content areas. The grid ensures that all components are aligned and that the design is responsive across different screen sizes.
- Typography: Your font choice reflects your brand identity. It also affects the user experience, like readability across devices.
- Color: A functional color palette consists of primary, neutral, and semantic colors.
- Iconography: Icons replace lengthy words and break through language barriers, representing actions, objects, or ideas.
- Interactive components: These include your text fields, checkboxes, menus, tabs, progress indicators, and buttons.
- Imagery: It fosters emotional resonance and provides context.
Wireframes and prototypes
Wireframes focus on layout and content priority. It answers the question, “What goes where?” While prototypes allow you to mimic the final software product and interact with it. It answers the question, "Does this work?”
Together, they enable you to structure and test software product ideas before fully investing in them. They help you save time and money and reduce risks.
Wireframing and prototyping come in different fidelity levels, which refer to the detail and accuracy in a software product design.
- Low-fidelity: Rough sketches or digital boxes for early validation of concepts and IA.
- Mid-fidelity: Grayscale, digital wireframes with basic interactions to test flow and hierarchy.
- High-fidelity: Close to perfect representation of the final layout, with interaction states for final usability testing and developer handoff.
Consult with one of the top UX design firms in the tech industry to help you create successful digital product designs.
The 5-Step Software Product Design Process
The following steps can guide your team in ensuring that each design decision aligns with user needs and business goals. But before you begin the software product design process, clarify the scope and success metrics, confirm available resources, set a timeline, and identify key constraints to ensure the process runs efficiently and delivers value.
Step 1: Discovery and research
Discovery identifies the problem and target users. It gathers evidence to shape product direction and reduces risks.
Below are some discovery and user research methodologies you can implement:
- Competitive Analysis: Understand existing solutions, gaps, and opportunities.
- User Interviews: One-on-one conversations that reveal behaviors, goals, and pain points.
- Diary Studies: Document interactions and perceptions of users about a software product to reveal patterns over time. It also logs frustrations that users might forget to mention during interviews or surveys.
- Surveys and Questionnaires: Validate patterns across a large sample of your target audience and identify which features to prioritize.
Set clear research goals and success criteria. Early user research saves time and budget by avoiding the creation of features that are disconnected from your audience's real needs.
Step 2: Define structure and user flows
Translate research into a logical structure and predictable user journeys. Design flows for failure as deliberately as for success. Consider progressive disclosure of complexity and points where users may need support during onboarding.
Some key outputs you must accomplish at this stage include:
- Sitemaps: Creating a hierarchical structure of pages so you can set the scope of your software design. It also serves as a shared map between other stakeholders and engineers of the product’s structure.
- Information architecture: Organize content and define functionality to help users find what they need easily. Users should never have to guess where they can find a particular piece of content.
- Prioritization frameworks: Frameworks like RICE scoring and MoSCoW help allocate resources to features that deliver optimal results. RICE scoring evaluates potential features based on reach, impact, confidence, and the effort required to implement them. MoSCoW identifies the must-have, should-have, could-have, and won’t-have software features.
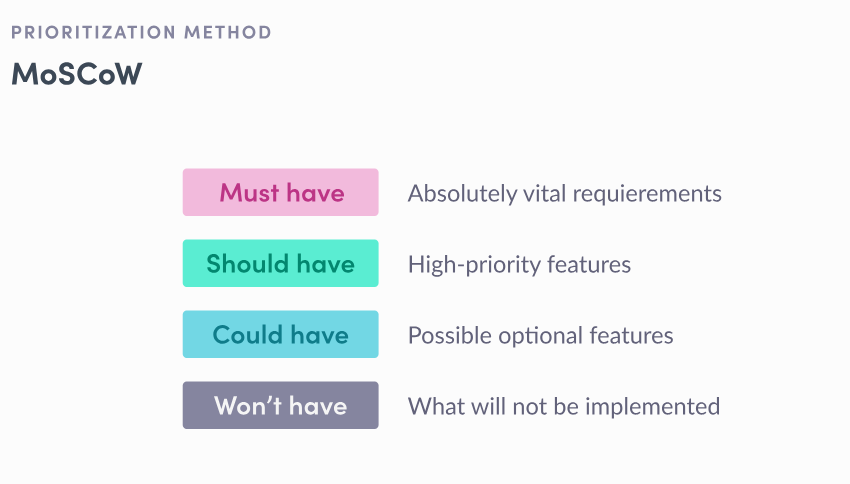
MoSCoW Framework. Image via Product School
Step 3: Wireframes and prototypes
Wireframes and prototypes translate sitemaps, user flows, and prioritized features into actual screen layouts that the design team can interact with.
Wireframes decide on what should be on the screen and what receives visual priority. It entails defining the layout grid, placing the primary navigation, establishing content zones (header, main content, footer, etc.), and determining the content hierarchy.
This is also where you identify the appropriate level of fidelity for your project. Higher fidelity is not always better, especially if you do not have the resources—people and time. That said, use the lowest fidelity necessary to answer your current question.
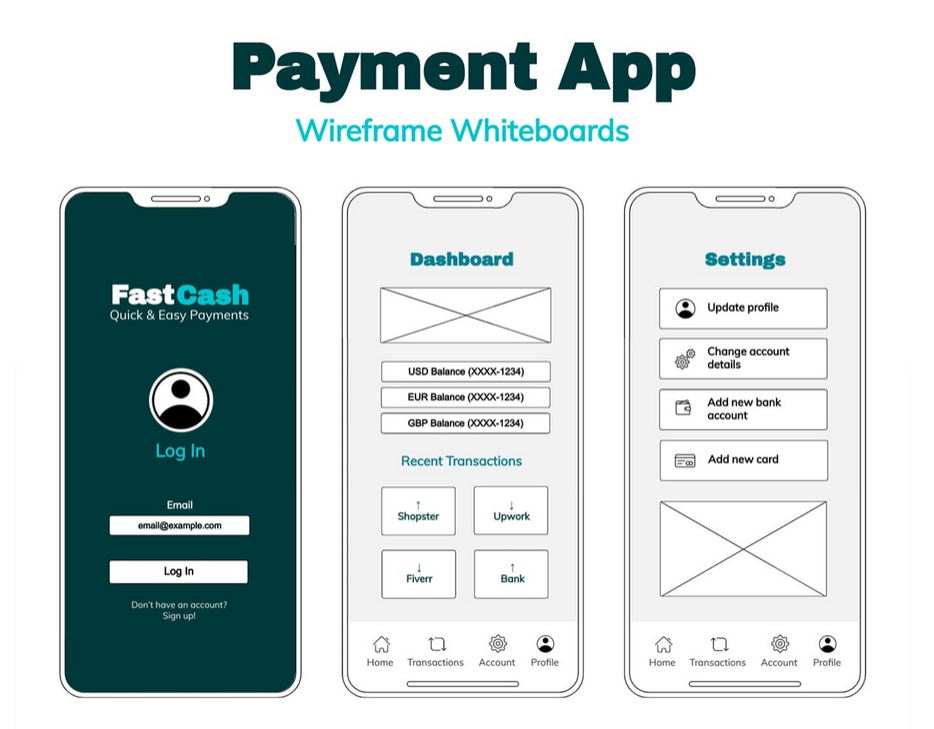
Product wireframe example via HelloPM
Prototyping lets you test different versions and solutions before fully committing. Therefore, it is vital to ensure the prototype is “test-ready” for it to produce accurate data. Inaccurate prototypes can confuse and lead to multiple rounds of iteration to correct flaws, wasting resources.
Select tools that support collaboration and inspection, like Figma, Axure RP, and other AI-powered platforms.
Step 4: Visual design and handoff
Once you have the final structure, you’re ready to add the final visual layer. This produces UI mockups that exist as frames used for handoff. At this stage, expect to:
- Apply the design system. Color palettes, typography, iconography, imagery, and micro-interactions are applied to create an aesthetic and functional interface that users enjoy.
- Specify all component states. Define every interactive state (default, hover, loading, error, etc.), so developers are clear about how each element should behave.
- Optimize for accessibility. Make sure that every visual component meets WCAG 2.1 Level AA standards, ensuring your software product is easily usable by people with disabilities.
Then, you’re ready for a developer handoff, where the final design is transferred to the engineers to create the software product. Treat handoff as collaboration between designers and software engineers. The prototypes must be accurate, inspectable, and documented.

Designer-to-developer handoff example via App Builder
Step 5: Testing and iteration
Testing uncovers usability gaps and real-world issues, while iteration turns findings into actionable improvements.
Testing and post-launch practices:
- Usability testing. It validates the software product design after development by assessing task completion, error rates, points of confusion, and overall satisfaction.
- Bug tracking and prioritization. It identifies and monitors issues discovered during testing. These are then prioritized by severity, from low to critical.
- Iteration planning. The same prioritization frameworks used to define user flows are applied to post-launch findings. It closes the loop, from design to development, generating discovery for the next product development cycle.
- Continuous monitoring. Testing and iteration are ongoing processes to ensure the software product functions as intended and avoids regressions. It also enables the adoption of changes in user behavior over time.
Create User-Focused Software Product Design
Effective software product design starts with understanding people and their problems. It follows a strategic process, from research and structure to flow, visual clarity, prototypes, and endless testing and refinement. This results in products that are accessible, meet user expectations, and deliver enjoyable user experiences. While smarter, advanced technology provides better features, the human-centered approach in software product design remains essential. So, keep learning, testing, and collaborating.
Are you ready to kick off your software product design project?
Mar 24, 2026

Creates insightful, strategy-driven content that translates complex design and branding concepts into accessible knowledge, supporting Ramotion’s mission to elevate digital experiences.